Being FPV lovers as we are, FDFlyers
team know how only a small group of lucky people could have a Fatshark FPV
goggles. Keeping in mind cost, you should valuate pros and cons a lot before purchase
it.
Therefore, we love to get you cheaper
alternatives to fly FPV, improving our basic goggles performance. So, we are
going to introduce you how we join VR-007 Eachine goggles to Eachine
ProDVR. Note that other alternatives are also valid to do it but we really feel
this is one of the better one.
VR-007 are used by our side
some time ago and it works really acceptable, despite of his price. Obviously “premium”
skills are not included (DVR, diversity…), and this is the main reason to set
some improvements. This way these basic goggles would be stepping up to next level.
What DVR is?
DVR means, literally, Digital
Video Recorder. It’s a very simple box capable to record digital videos. To our
interest, very useful video recorder, directly from FPV camera.
There are two main reasons to
set it into your goggles:
- · Find the quad when you lose it after a crash in a low visibility location, checking your records.
- · Have video records of tiny drones, not capable to carry an action camera, as in Tiny Whoop.
To stock the videos, microSD needs to be set in
DVR (microSD is not included). In better FPV goggles, DVR are included in basic
settings, but not in so many of the basic goggles, normally below 80$.
You should note video quality is not HD,
far from the quality obtained using on board action camera as GoPro, Runcam or
SJCam for instance. Anyway, you could see your flights, saving money (action
camera not needed) and weight mounted in the drone. In summary, I guess almost
all of you will use with your Tiny Whoops.
To this project we have chosen Eachine ProDVR.

To this project we have chosen Eachine ProDVR.

Eachine ProDVR
Materials
You should note the project is quite easy and
also cheap. Will spend a little time to implement it. Furthermore, almost
all you will need to do it is already included in goggles and DVR packages.
Materials list:
- · Eachine VR-007 FPV goggles.
- · Eachine ProDVR video recorder.
- · MicroSD.
- · Power cable.
- · Double sided tape (included in DVR).
- · Multimeter.
- · Welder.
- · Tin.
- · Screwdriver.
- · Nail varnish or silicone.
As you see,only
a few materials would be needed to improve your goggles.


Eachine VR-007 / Eachine ProDVR
Note that you could set DVR in similar goggles.
We also know there are more DVR close to this (price and performance). HMDVR works also fine (not tested by the team) but we have checked this configuration and really feel could be the
better price-performance.
Making off
Be sure you have all you will need, ready to be
used before start the process.
Firstly, you should disassemble the goggles.
Very easy to do, removing 4 screws set in the down side. Be sure, you are
handling carefully because most important parts keep’s unprotected then.
Second step you should put off the receiver,
sited in front-lateral side. Note that you should remove a little screw in
charge to keeps fixed the receiver to goggles structure. Now three little
pieces should be saved (2 screws and a little button). To facilitate handling,
it’s recommendable to remove power cable connecting receiver to the screen.


Removing receiver
Now you should able to identify GND, +5v and
video points in circuit board. Note that only is needed to be set central socket
cable bus of DVR. In DVR package, could choose two different wire buses to
solder in the board. We choose the one with connectors (should be cut) but both
are capable.
Don’t be afraid in soldering time, it’s very
easy to identify where the cables should be soldered (you could see it in the
photo).
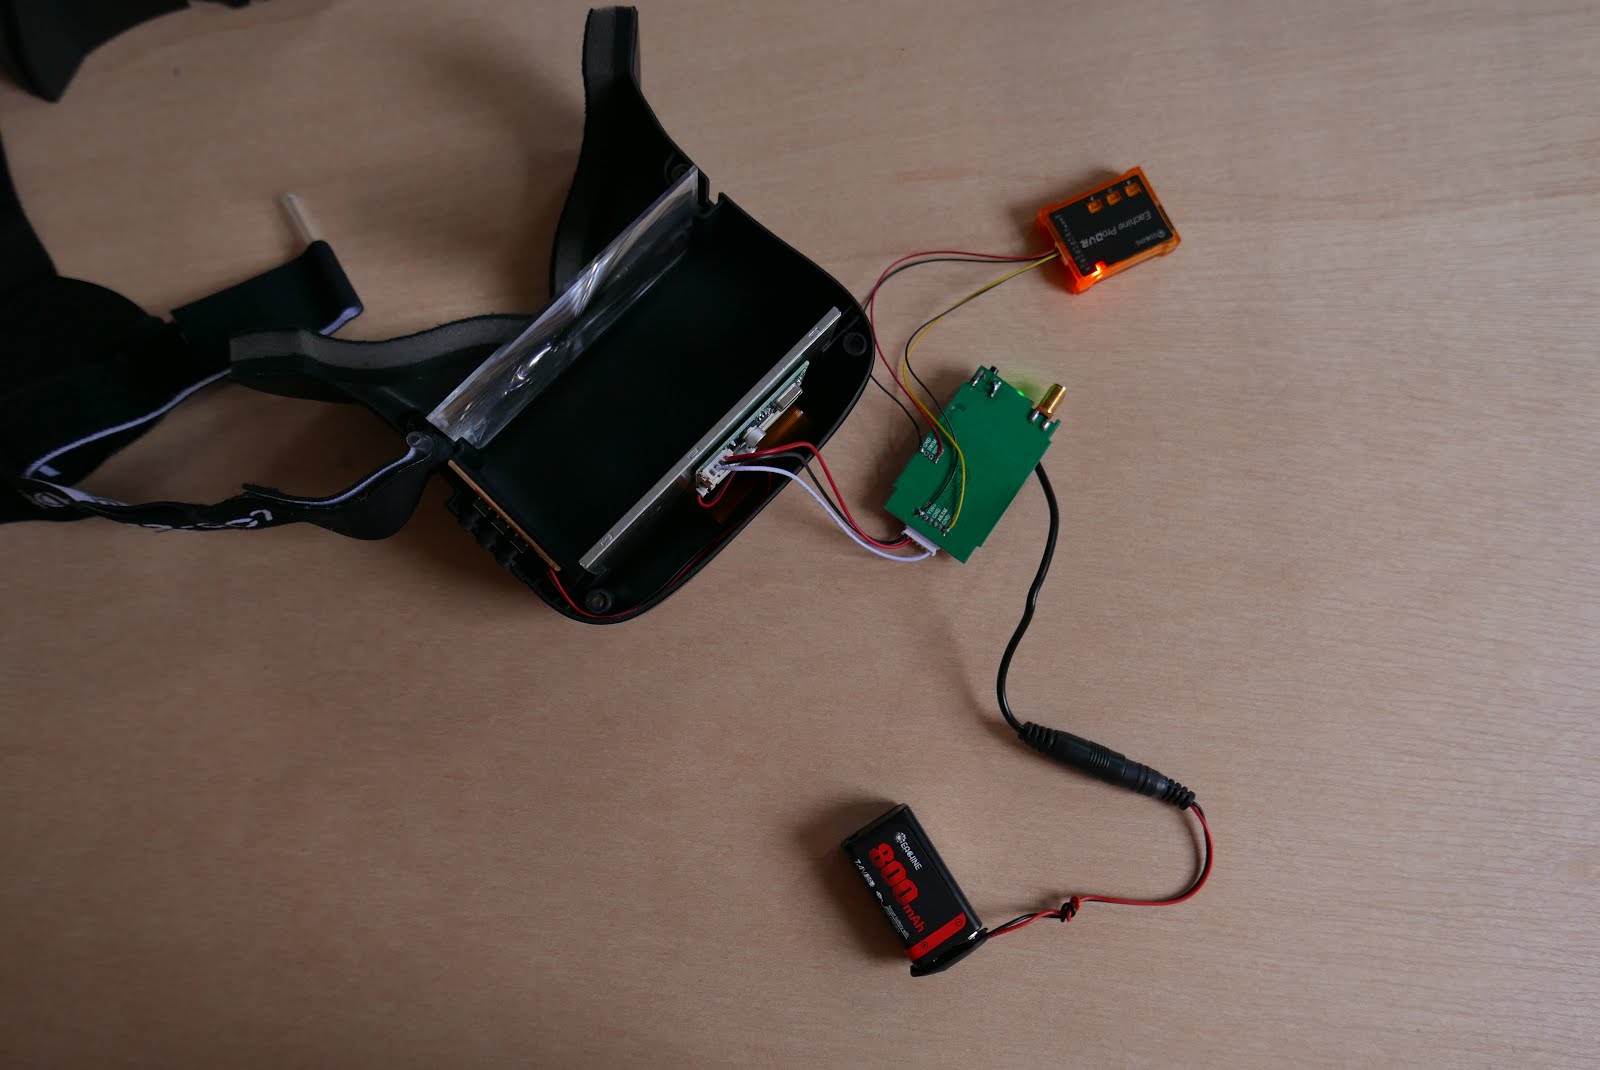
Please, check with multimeter you are not overcharging DVR, it works with 5 volts. Set battery and check.

Please, check with multimeter you are not overcharging DVR, it works with 5 volts. Set battery and check.

Battery almost empty in the measurement time
Red wire in +5V, black in GND (there are two or
three black wires, depends on the chosen wire, should be fixed all each other)
and, finally, yellow one on “video” soldering point. For your information,
there is more than one point where wires could be set, are the same electric
points so no matter which one you choose.

Soldering points
Time to check if it works.
It’s very IMPORTANT
set previously antenna in receiver to prevent damages. Connecting battery DVR
must show a little red light led.

Important to set antenna, unfortunately we forget it
Recommendable in this step to enforce soldering
points with nail varnish or silicone. Will prevent short circuits.
Next step, rearm the goggles. Be patient, this
process it’s more difficult that seems to be. Wires inside tend to go out of
the frame the time you try to close the goggles.


Choose where DVR will be set in the frame. Note
that wires could pass same hole as battery wire, but wires are short enough to
provoke DVR keeps hung.
Another option is to drill a hole on purpose
and set DVR where you prefer.
Last option is use tiny slits up in the buttons
on the right of the goggles. We have chosen this option due cable allow to set
DVR upside of the goggles, close to antenna. Looks great.


You could see three referred buttons
Set DVR with double sided tape wherever you
want and that's all! You are now able to record your flight experiences.


Final appearance
Press right arrow (>) to start/stop the record.
Red led is switching when recording process is on and fixed otherwise.


*To configure DVR parameters, you should
connect it to different screen/FPV goggles with dedicated wire, setting it in
the upside DVR socket.
In summary
We are very proud to share you our DIY experience. FPV goggles are now one step up, talking about quality. So highly
recommend to do it in yours.
You will spend a little time obtaining great
results. Easy and cheap.
*Coming soon you could check the entire process
in youtube, video is being processed in the meantime.
Thanks for checking the post. Soon more DIY projects.
We love it!
Thanks and enjoy.
FDFlyers.
Comments
Post a Comment